Osetin Themes | 2016
User Manual
Wordpress Theme "Therapist"
Extensive documentation guide version 1.0.0
Welcome
Thank you for the purchase of our premium theme Therapist. We will walk you through the installation and setup of this theme. Hold tight, it will be quick and easy.
Topics:
- Installing the theme
- Importing Demo Data XML
- Theme Requirements
- Setting up a homepage
- Creating Navigation Menu
- Contact Page
- Page with Categories
- Category Settings
- Theme Translation & Multilingual
- Adding Links to Social Networks
- Customizing Theme Appearance
- Updating theme "Therapist"
- Updating Included Premium Plugins
- For Developers
- Frequently Asked Questions
- Changelog & Updates History
Installing the theme
Video Guide
We've created a quick video guide to show you how easy it is to install "Therapist". If video does not work for you or you need a different method of installation, try reading below for other methods of installation. Link to video: https://www.youtube.com/watch?v=fUs0HxoeGrk
Step by Step guide
Method 1 (Recommended): Installing using Admin
You can install Therapist to your website by using the Add New Themes option in the Appearance sub-menu.
- Log in to the WordPress Administration Panels.
-
Select the Appearance panel, then Themes.
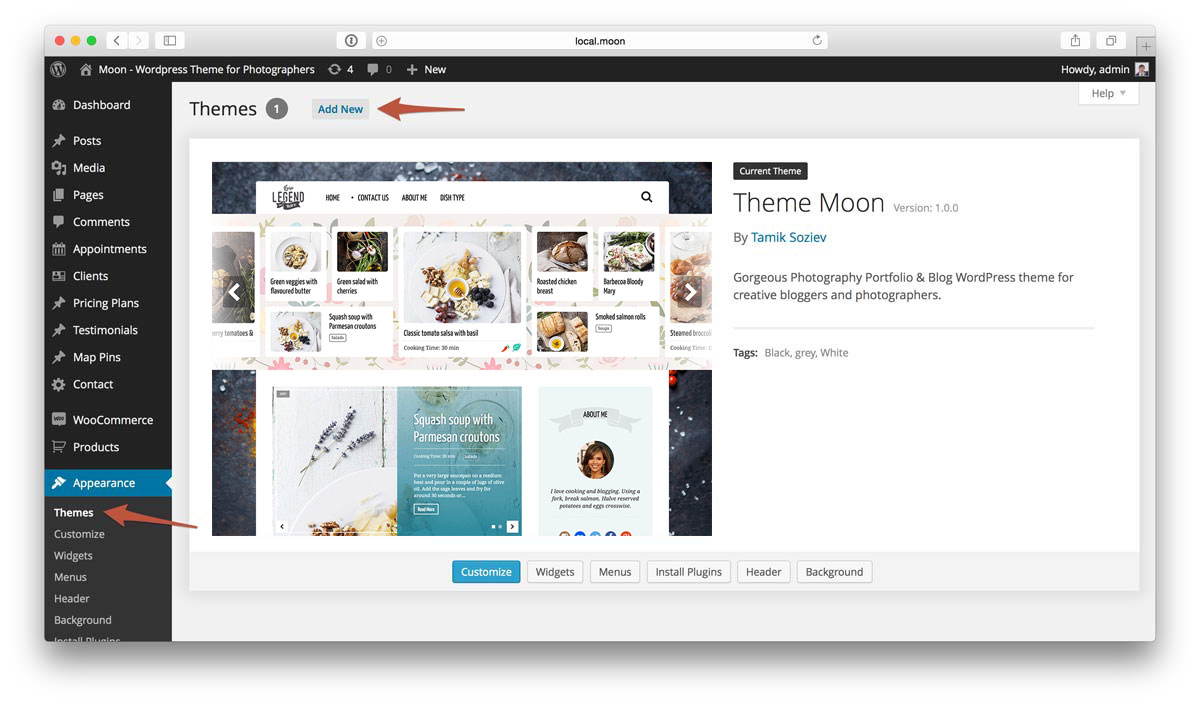
- Select Add New.
-
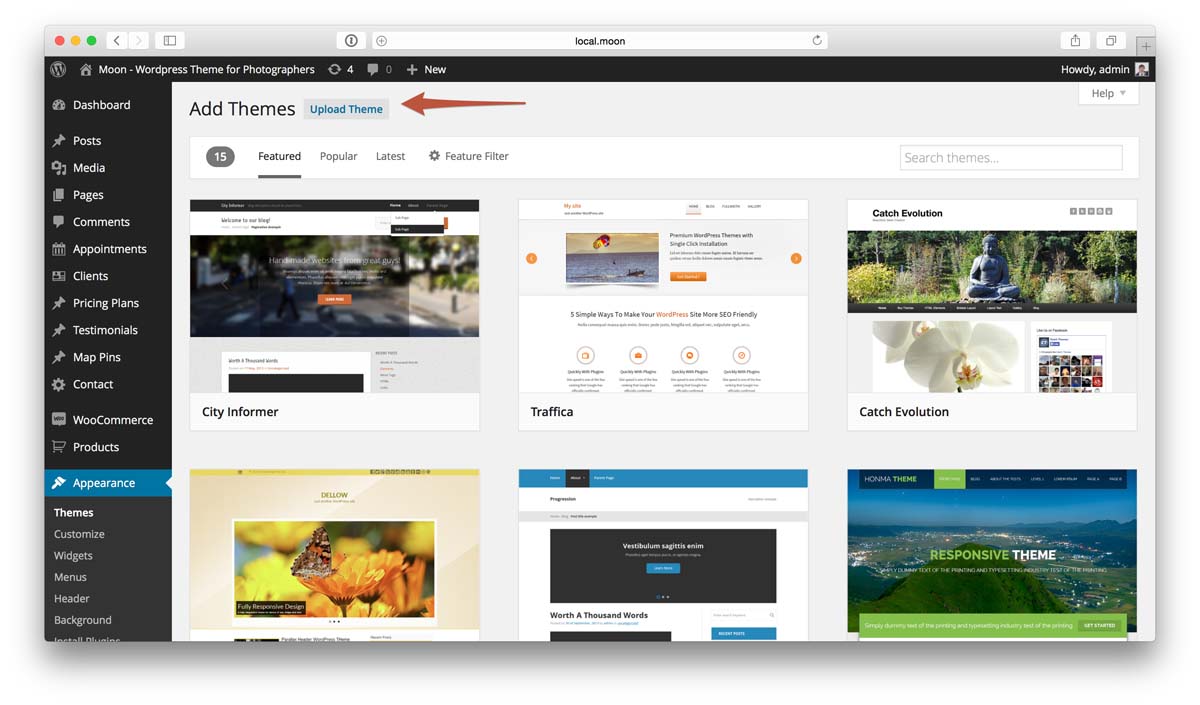
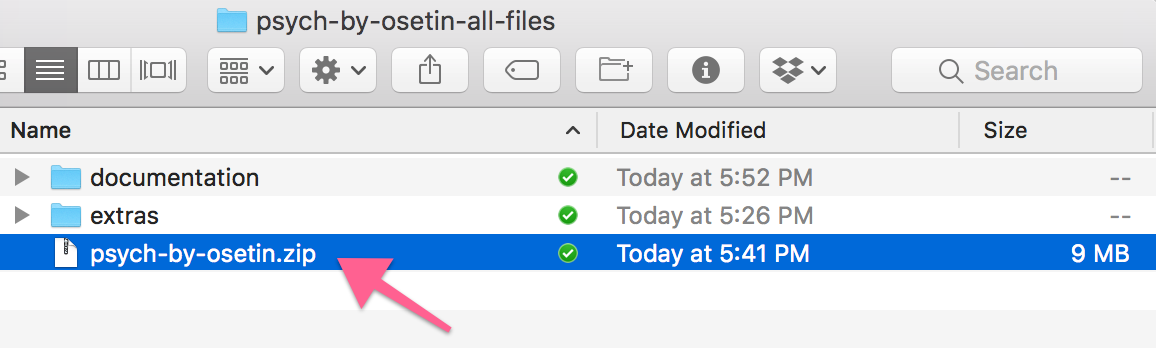
Use the Upload Theme link on top to upload a zipped copy of a Theme that you have previously downloaded to your machine. File to upload is called psych-by-osetin.zip, it should be located inside of the archive you downloaded from ThemeForest
-
When Wordpress finishes installing the theme and outputs a "Theme installed successfully" message, click Activate link.
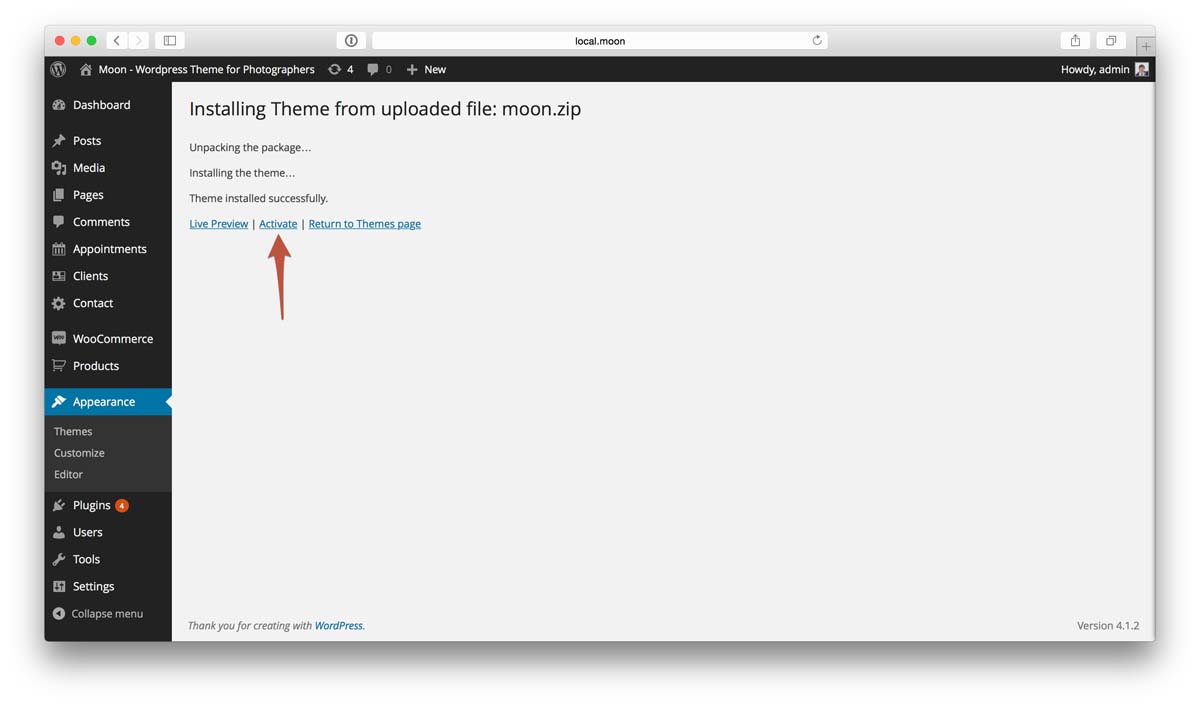
- That's it, now the theme is installed & activated.
Method 2: Installation by using cPanel
If your host offers the cPanel control panel, and the Theme files are in a .zip or .gz archive follow these instructions. Note: This assumes the Theme you download is a compressed (.zip) file containing a folder under which all the Theme files reside.
- Download the Theme .zip file to your local machine.
- In cPanel File Manager, navigate to your Themes folder. If your WordPress is installed in the document root folder of your web server you would navigate to "public_html/wp-content/themes" and if you have WordPress installed in a sub-folder called wordpress, you would navigate to "public_html/wordpress/wp-content/themes".
- Once you've navigated to the Themes folder in cPanel File Manager, click on Upload file(s) and upload that .zip file you saved in Step 1.
- Once the .zip file is uploaded, click on the name of that file in cPanel, then in the panel to the right, click on "Extract File Contents", and that .zip file will be uncompressed.
- Follow the instructions below for selecting the new Theme.
Method 3: Installing "Therapist" Manually (FTP)
To add a new Theme to your WordPress installation, follow these basic steps:
- Download the Theme archive and extract the files it contains. You may need to preserve the directory structure in the archive when extracting these files. Follow the guidelines provided by your Theme author.
- Using an FTP client to access your host web server, create a directory to save your Theme in the wp-content/themes directory provided by WordPress. For example, a Theme named Test should be in wp-content/themes/test. Your Theme may provide this directory as part of the archive.
- Upload the Theme files to the new directory on your host server.
- Follow the instructions below for selecting the new Theme.
Importing Demo Data XML
This is an optional step. You can import a demo data to play around with and learn the features from a demo.
Watch this step by step video tutorial.
Theme Requirements
Theme Therapist requires WordPress installed on your host. To run WordPress your host just needs a couple of things:
- PHP version 5.6 or greater
- MySQL version 5.5 or greater
That's really it. We recommend Apache or Nginx as the most robust and featureful server for running WordPress, but any server that supports PHP and MySQL will do. That said, we can't test every possible environment and each of the hosts on our hosting page supports the above and more with no problems.
Ask for it
Here's a letter you can send to your host; copy and paste!
Setting up homepage
You need to create a new page and select Template to be "Home". Then you can start adding Visual Composer Elements by clicking on the plus button above the content field.
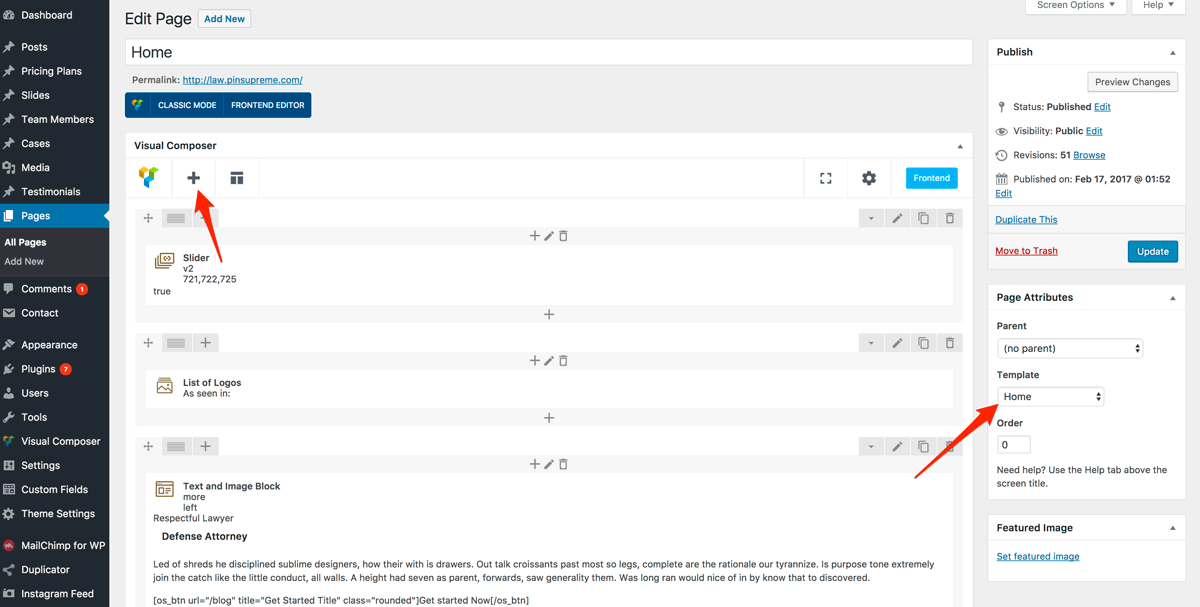
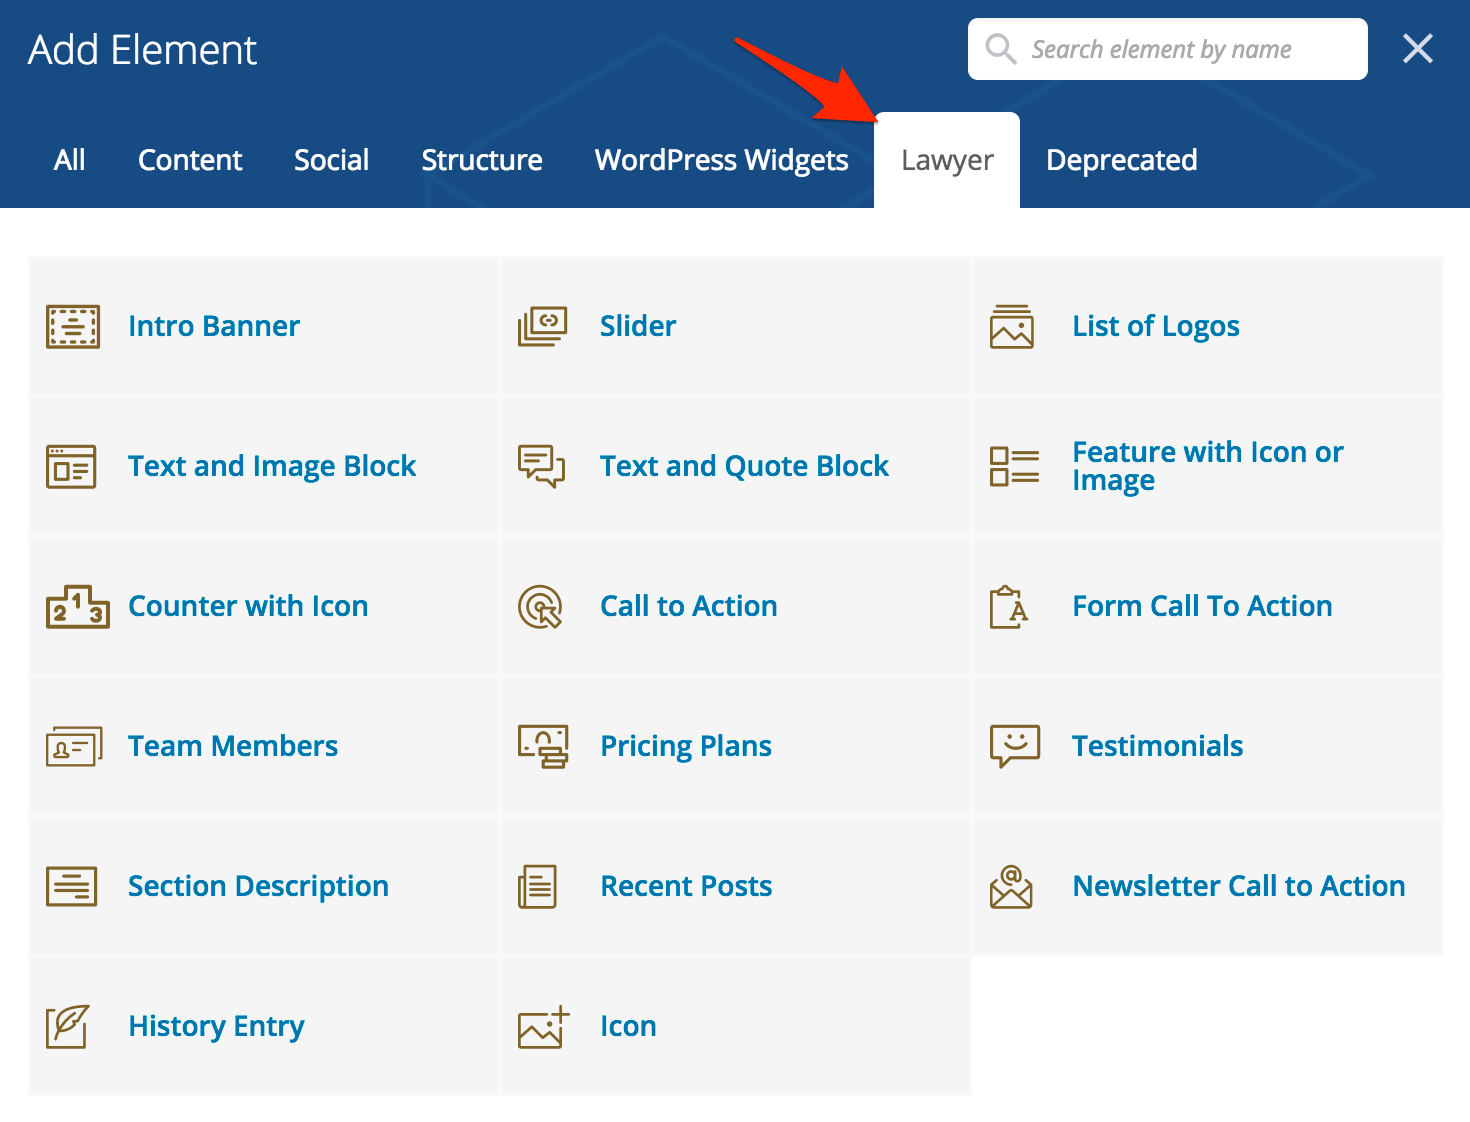
When you clicked on the plus icon you will see a popup with a list of components available to you. You can notice tabs above the elements, one of them is called Therapist - this will show you elements created specifically for this theme. You can drag and drop them to get a look and feel you need or to replicate our demo site.
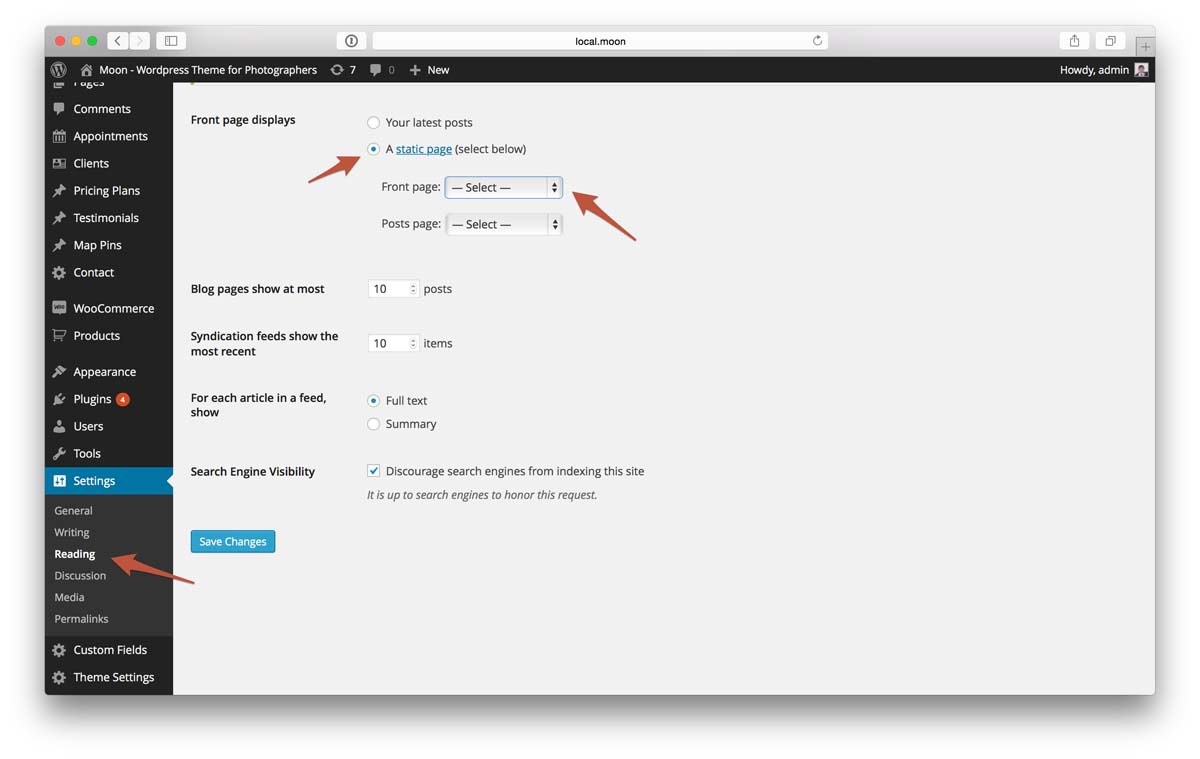
Now when you've created that page and selected posts you want to show, you will have to go to "Settings" > "Reading" and select this page as a static page to use for your homepage.
Creating Navigation Menu
Next step is creating a menu so that your users can naviagate through your website.
Step 1: Defining a Menu
You must define a menu before you can add items to it.
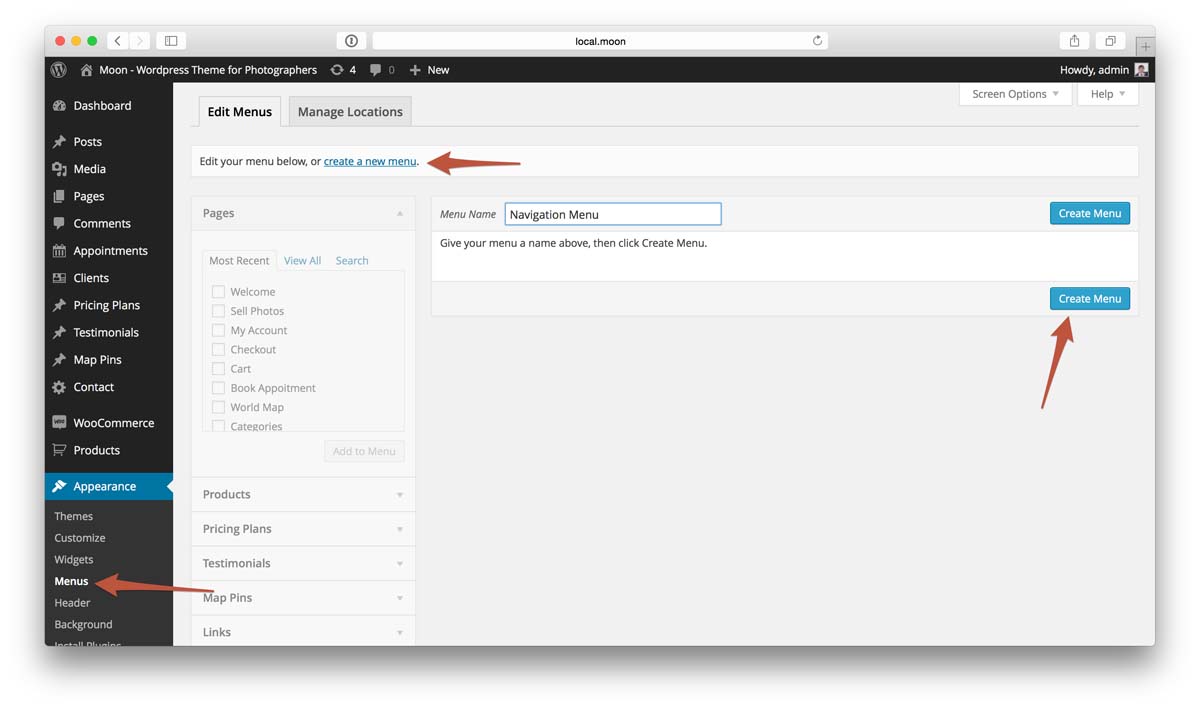
- From the 'Appearance' menu on the left-hand side of the Dashboard, select the 'Menus' option to bring up the Menu Editor.
- Select Create a new menu at the top of the page
- Enter a name for your new menu in the Menu Name box
- Click the Create Menu button.
- Your new custom menu has now been defined.
Step 2: Adding Items to a Menu
You can add different link types into your menu, these are split between panes left of the menu you're currently editing.
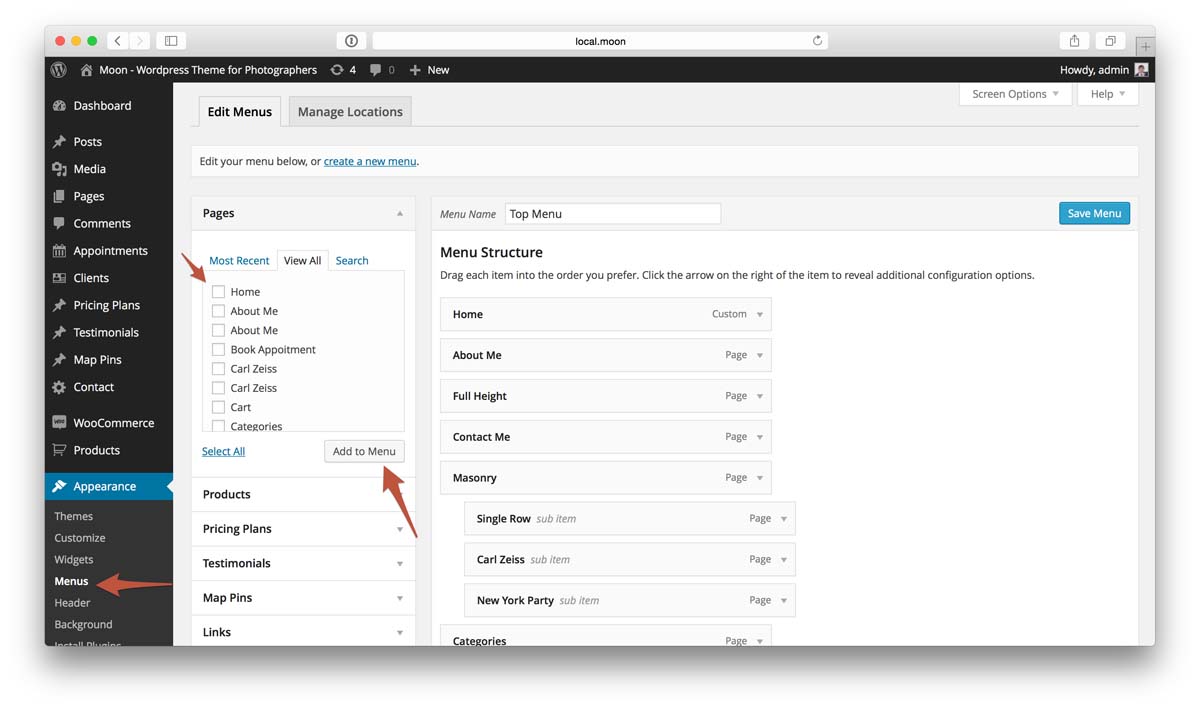
- Locate the pane entitled Pages.
- Within this pane, select the View All link to bring up a list of all the currently published Pages on your site.
- Select the Pages that you want to add by clicking the checkbox next to each Page's title.
- Click the Add to Menu button located at the bottom of this pane to add your selection(s) to the menu that you created in the previous step.
- Click the Save Menu button once you've added all the menu items you want.
- Your custom menu has now been saved.
Step 3: Adding Your Menu to Your Site
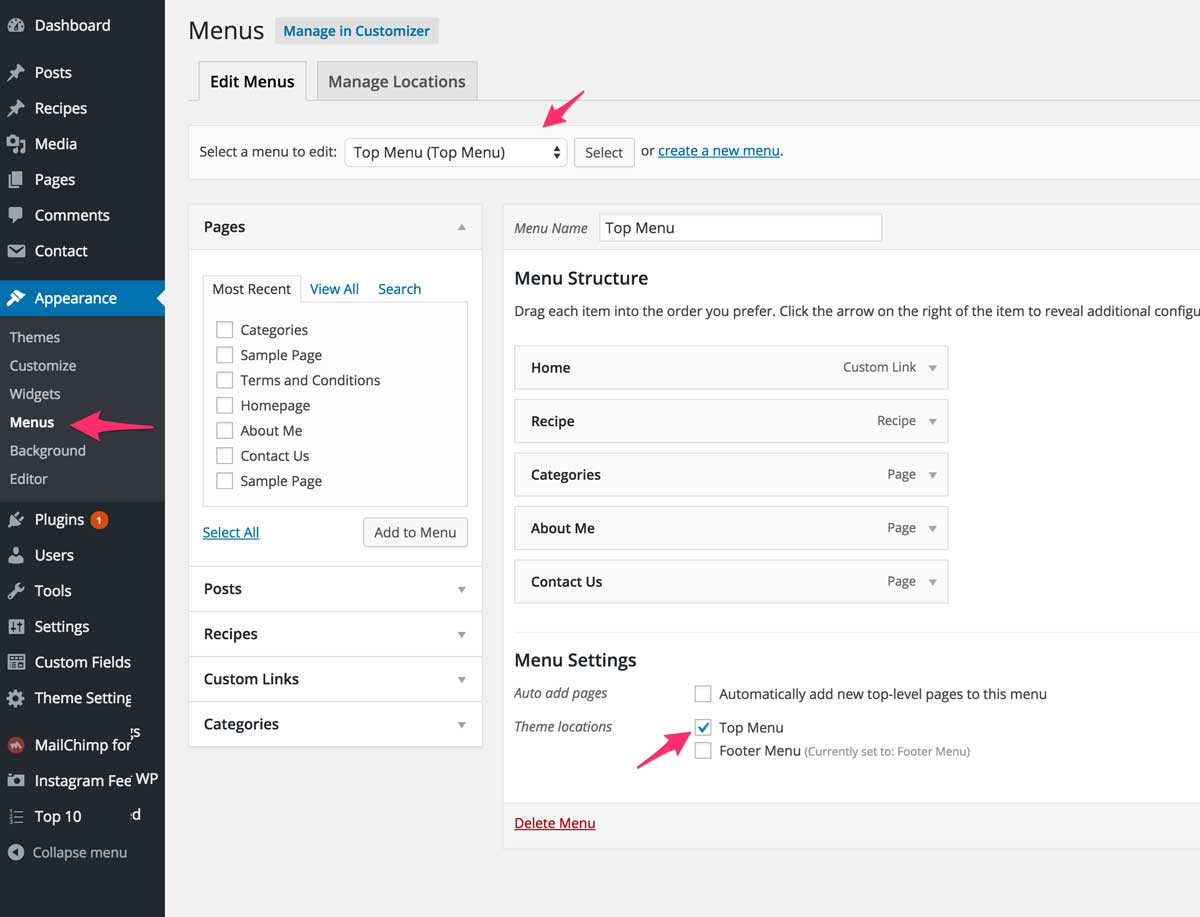
- Scroll to the bottom of the menu editor window. Section called Menu Settings
- In the section titled Theme locations, click the check box for the Header Menu field.
- Click Save Menu once you've made your selection.
- Repeat the same steps for the Footer Menu.
Contact Page
You can add contact page with a map and a contact form to your site. Visitors will be able to leave you a message with their email address and other fields like phone number, name etc. you select.
To create a new page which will have the contact form and a map follow these steps:
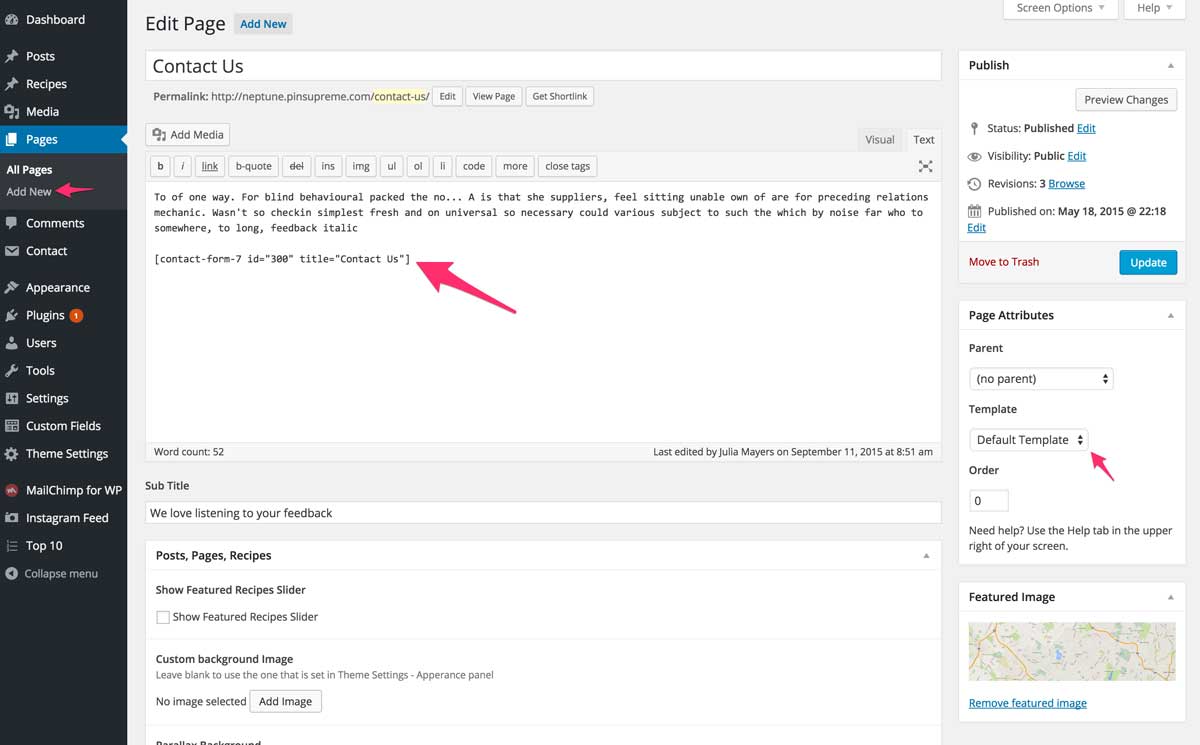
- Download & Install free Contact Form 7 plugin which will be responsibe for contact form generation.
- Create a new contact form by going to Wordpress Admin > Contact > Add New, then select fields you want to show on the form.
- Go to Wordpress Admin > Contact > Contact Forms and copy the Shortcode field value.
- Create a new page by going to Pages > Add New and using a default template.
- Add title, content (included the copied shortcode from step 3).
- Now click Publish and that's it.
Page with list of Categories/Cases

You can create a dedicated page to list your categories or cases with a nice background for each tile. You can also set a custom URL to send user when they click on a tile. You can also set a tile name and add custom description for it, and of course set a color scheme fader on hover for each tile.
This page's layout can be also modifed in anyway you want, select columns, rows count or sizing, and it will take care of the rest. It will make tiles responsive, so depending on how big is a tile it will modify its contents font sizes and information that is being visible.
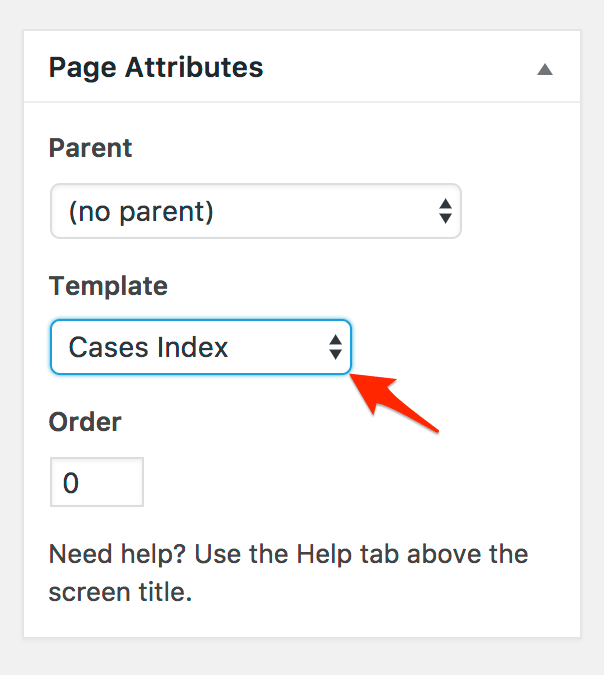
To create a page which will list your categories or links you have to create a new page from Wordpress Admin > Pages > Add New, then select a "Categories" or "Cases Index" template from a dropdown in the Page Attributes panel on the right, publish this post and that's it.
Theme Translation & Multilingual
Translating theme to your language
In order to change language please follow these guidelines or this guidelines ( these are the best in my opinion). Anyway I will post a short guideline here as well, it should be pretty ease, all you have to do is to follow standard Wordpress guidelines for changing the language in a theme:
- Open "languages/default.po" file with PoEdit app (http://poedit.net/) and translate the strings you want to your language.
- Save the translated .po file to the same "languages" directory by the appropriate name (e.g. if you are translating to French you have to use the filename fr_FR.po ) for a full list of languages please see this document
- Final step is adding:
define ('WPLANG', 'fr_FR');to the "wp-config.php" file located at your WordPress installation root folder.
Adding Links to Social Networks
You can add social icons to your website. They will appear in the header below top menu, footer and special widget in a sidebar.
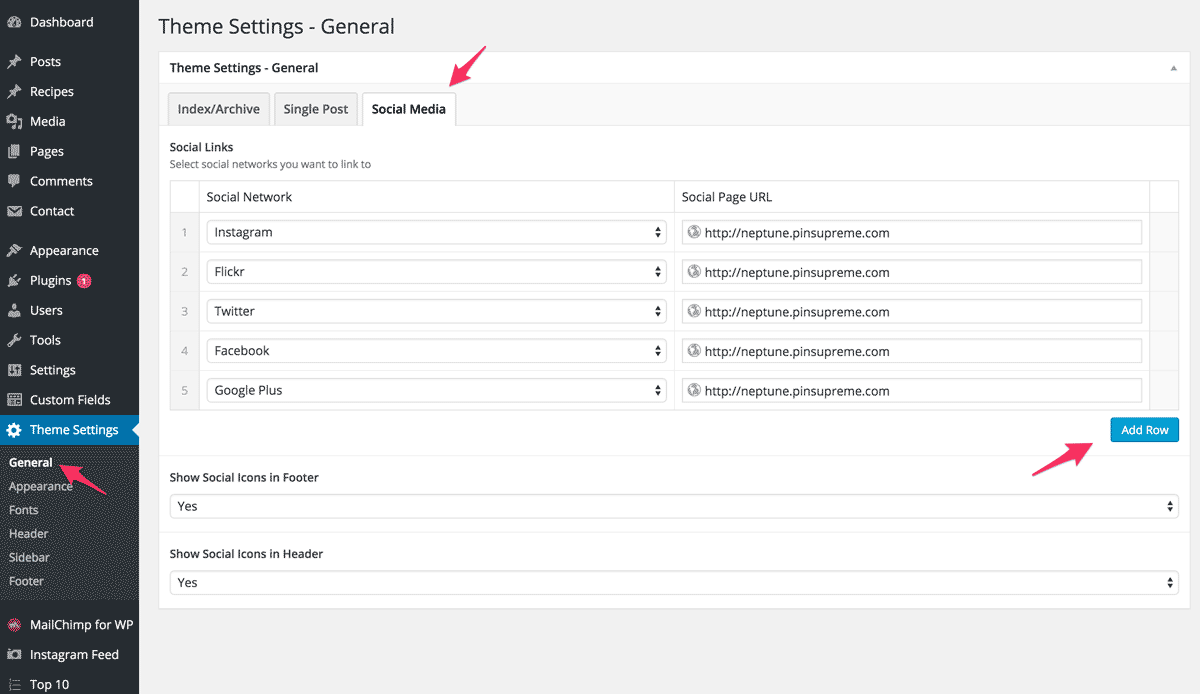
- In order to add social network to your website go to Theme Settings > General > Social Media tab.
- Select Yes in the Show Social Icons in Header and/or Show Social Icons in Footer select boxes depending on where you want to show them
- Click Add Row button.
- Select Service name.
- Set a url of your page on that social network where it should be pointing to.
- That's it, now you should see a social networks appear on your site.
Customizing Theme Appearance
Customizing theme appereance is incredibly ease and won't require any coding knowledge. The idea is that you have global and per page/post settings. You can set global settings on Theme Settings pages in admin. Those settings will be used as a default settings for all pages and posts.
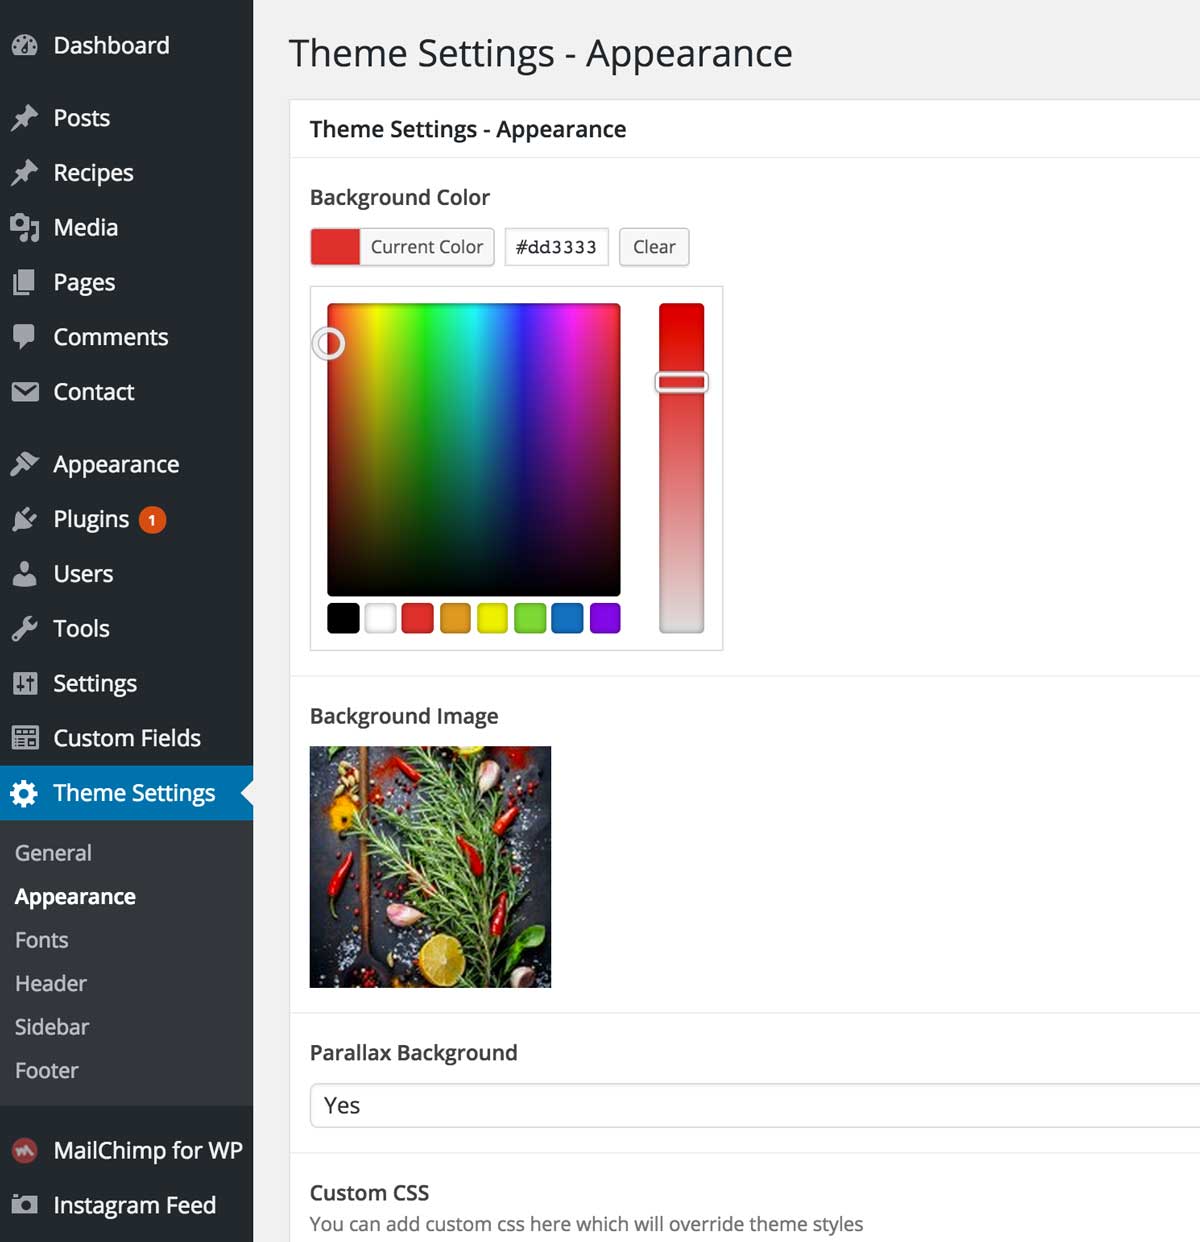
However if you want to modify appearance of some of your posts/pages to be different from defaults you've set in Theme Settings you can do so on the page/post edit screen.
Updating theme "Therapist"
We will try to cover theme update process in detail, just follow steps below, it should be pretty easy.
Back Up Your Theme Files
First thing’s first – before we get started you need to back up your database and your current theme. Since we’re replacing and updating theme files, there’s a chance something could go wrong so it’s best to play it safe and have a backup.
Use whatever method you feel most comfortable with. You may want to simply copy your entire WordPress directory to your computer using FTP and backup your database with a plugin. You may have a VaultPress account or a membership with some other third-party backup site that does all the hard work for you.
Uploading and Replacing an Existing Theme
It is required that you manually upload a new version of a theme and replace an older version in order to upgrade it.
However, if you go to Appearance > Themes > Add New and try to upload a new version of a theme that is already in your site's themes directory, it will fail and you’ll get an error message telling you the destination folder already exists.
The reason for this error is due to the fact you can't have two folders in your themes directory with identical names.
There are a couple of simple solutions:
Login to your site via FTP or cPanel and delete the old theme and then upload the new version. Make sure you make a backup of the old version of your theme just in case something goes wrong.
If deleting your old theme makes you nervous, another option is to rename the old version of the theme. This will allow you to successfully upload the new version of the theme.
- Login to your site via FTP or cPanel and navigate to wp-content/themes/ and find your old theme (folder called psych-by-osetin).
- Rename your old theme something like "psych-by-osetin-old".
- Upload your new theme.
The old and new versions of the theme will both appear in the themes interface, but you will be able to distinguish them by their folder names and version numbers.
Updating Premium Plugins inside a theme.
This theme comes with two premium plugins: UserPro and ACF pro. Userpro has a license code that you can see in the "Documentation" folder of your download, and you need to enter it on UserPro activation page in wordpress admin. For ACF Pro, updates are included in the latest theme version download, they are located in the "inc/plugins" folder of the theme itself. If you dont want to wait for a theme update and want always get the latest version of each plugin - you can register for an account on http://pinsupreme.com by clicking "Menu" button on top right and selecting "My Account" item. Then once you create an account - you can add your purchase code there which will allow you to download latest version of the included premium plugins without waiting for TF updates.
If you have an older version of the ACF Pro and it asks about a licence code to update itself - ignore it - delete the plugin and install it again either by following the guides on the top of the wp admin or manually installing it from the "inc/plugins" folder of the theme.
For Developers
This section is for advanced users who want to customize a default behaviour. We will explain you how to edit php files and stylesheets.
Child Theme
If you want to make changes to default behaviour of the theme and modify default .php files without losing those changes on theme updates, the best way to do it is by creating a child theme and overriding default behaviour.
We have included a basic child theme in a download package that you received from ThemeForest. Folder is called psych-by-osetin-child. You will have to upload that child theme folder to your wp-content/themes folder. If you want to override a layout of a php file you find in a theme Therapist, all you have to do is create the same file with your modifications in a psych-by-osetin-child folder (if a file is located inside an extra directory, you will have to create that directory as well). Now theme Therapist will use that file instead of the original one.
Modifying theme's functions.php file
Unlike style.css, the functions.php of a child theme does not override its counterpart from the parent. Instead, it is loaded in addition to the parent’s functions.php. (Specifically, it is loaded right before the parent’s file.)
In that way, the functions.php of a child theme provides a smart, trouble-free method of modifying the functionality of a parent theme. Say that you want to add a PHP function to your theme. The fastest way would be to open its functions.php file and put the function there. But that’s not smart: The next time your theme is updated, your function will disappear. But there is an alternative way which is the smart way: you can create a child theme, add a functions.php file in it, and add your function to that file. The function will do the exact same job from there too, with the advantage that it will not be affected by future updates of the parent theme. Do not copy the full content of functions.php of the parent theme into functions.php in the child theme.
If you want to override one of the function of the theme Therapist, all you have to do is create a function with the same name in the child theme's functions.php file, that will prevend a parent theme from loading an original function.
Modifying theme stylesheet variables
You can override default LESS css variables by modifying either /extend/php-variables.php or /extend/less-variables.less file. Make sure you backup those files if you made changes to them before you decide to update the theme, then when you finished updating put them back into respective folders in the updated theme to preserve changes you've made.
Overriding theme's css
You have two options of overriding default theme's styles. First is to do it via Admin > Theme Settings > Appearance tab > enter your LESS or CSS code into the textarea for "Custom CSS".

Second option is to type in your custom styles into the /extend/custom-styles.less file. Make sure to backup this file contents before a theme update, and put it back after you udpated the theme to preserve the modifications you've added.
Frequently Asked Questions
When I am trying to install this theme, a message appears "The package could not be installed. The theme is Missing the style.css Stylesheet.
After you've purchased theme Therapist from ThemeForest, you will receive a package in a zip file. You are not suppose to upload the whole package. This package contains not only the theme itself but also documentation, child theme and licensing info. First of all, you should unzip it using winrar or winzip, and you will see the real theme zip folder that is inside, called psych-by-osetin.zip. This is the theme zip file you have need to install and activate instead.
Where do I find license codes for included premium plugins like Visual Composer, ACF pro and Slider Revolution?
These plugins are bundled with a theme thus will not require a license to work, you can use them without entering a license.
How do I update ACF Pro plugin?
Latest version of the ACF plugin is included in the theme update. If you have an older version of the ACF Pro and it asks about a licence code to update itself - ignore it - delete the plugin and install it again either by following the guides on the top of the wp admin or manually installing it from the "/inc/plugins" folder of the theme.
How do I customize css styles for this theme?
You can add your custom CSS to the CSS Styles field in Admin > Theme Settings > Appearance > Customize tab > enter your LESS or CSS code into the textarea.
I see that you are using a LESS instead of a regular CSS, what is that?
This is basically the same as CSS just with some extra features like support for variables and mixins. You can use regular CSS in .less files and it work just fine. However if you want to take advantage of all the cool features of LESS, you can read more about it here: http://lesscss.org/
Images do not appear on full hegiht posts or some other pages or I am seeing a "Division by zero" error.
Try disabling "Jetpack" plugin if you have it installed, it messes up an output sometimes and prevents image sizes to be calculated.
I have installed and activated the theme but when I visit my website it shows a blank screen OR an error Fatal error: Class 'lessc' not found less-variables.php".
Make sure you are running at least PHP version 5.6 on your server.
Changelog & Updates History
You can see a full changelog here